Follow in the footsteps of Rina, take you to know more aluminum profile products
Hey there, fellow aluminum aficionados! Rina Meng here, your go-to gal for all things aluminum profiles. Today, I’m here to spill the beans on the oh-so-important topic of door and window sealing strip installation. Trust me, folks, this is the stuff that separates the pros from the amateurs in the aluminum profile industry. So, grab your tool belts, put on your thinking caps, and let’s dive right in!
Picture this: You’ve just purchased a brand-spanking-new set of sleek and stylish doors and windows for your humble abode. You’re practically bursting with excitement to install them and bask in the glory of your home’s upgraded aesthetic. But hold your horses, my friend! Before you can revel in the beauty of your new fixtures, you need to ensure that the door and window sealing strips are installed with finesse and precision.
Now, let’s get down to the nitty-gritty of sealing strip installation. First things first, we need to clean up any pesky debris lurking in the notches. Trust me, you don’t want any unwanted surprises popping up during the installation process. And speaking of surprises, let’s make sure those glass placements are even-steven, shall we? We don’t want any accidental collisions or misalignments throwing off the whole shebang.
When it comes to the sealing strip itself, remember this golden rule: don’t pull it too tight! We want to gently tuck it into place, ensuring a straight and snug fit. It should cozy up to the glass and the glass notch like long-lost pals at a reunion. This way, the force exerted on the glass will be distributed evenly, and we’ll achieve that much-desired airtightness.
Now, here’s a little trick of the trade for you: squeeze the glass with the sealing strip and leave a gap for some glue injection. Ah, the sweet sound of glue oozing into place! Make sure the depth of the glue injection is at least 5mm. And here’s a pro tip: while the glue is still in its gooey state, keep the glass free from any unnecessary vibrations. We don’t want any wobbly windows, do we?
Let’s not forget about the tops of our doors and windows. We need those babies to be tightly sealed with the surrounding frame sash. Think of it as a warm, cozy blanket hugging your windows, keeping the elements at bay. After all, we wouldn’t want any unwelcome drafts sneaking into our cozy sanctuaries, would we?
Now that we’ve covered the installation process, let’s talk about choosing the ideal door and window product structure through the rubber strip. It’s like finding the perfect pair of shoes to match your outfit, but for your home!
First things first, let’s talk materials. EPDM rubber strips are the crème de la crème, my friends. They’re imported, they’re top-notch, and they’ll stand the test of time. Say goodbye to those PVC material strips that are on the verge of extinction. Trust me, you don’t want to be caught with outdated strips on your doors and windows.
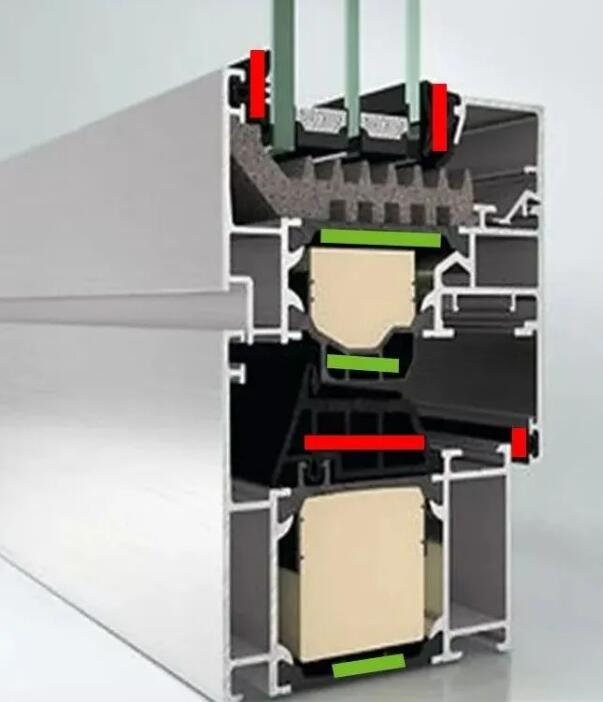
Next up, let’s consider the number of sealing channels. Three is the magic number here, folks. A three-sealing product with a middle rubber strip will outshine its two-sealing counterpart any day of the week. It’s like having an extra layer of security for your home, ensuring that airtightness we all crave.
Brands matter, my friends. When it comes to adhesive strips, go for the gold. Choose reputable brands that have stood the test of time. After all, you wouldn’t trust just any old adhesive strip to keep your doors and windows snug, would you?
Now, let’s talk shapes. Different shapes of adhesive strips offer different functionalities. It’s like having a secret superpower for your doors and windows. So, if you’re going all out and demanding the best, explore the world of high-demand products and find the shape that suits your fancy.
Last but not least, let’s talk about lap joints. No, we’re not talking about a dance move here. We’re talking about the contact area between the rubber strip and the frame leaf when your doors and windows are locked. The more overlap, the merrier! A greater overlap means a better sealing effect, my friends. It’s like a bear hug for your doors and windows, keeping them safe and sound.
Overall, my fellow aluminum enthusiasts, the installation of door and window sealing strips is no small feat. It requires finesse, attention to detail, and a touch of humor, of course! So, roll up your sleeves, put on your favorite playlist, and get ready to tackle this challenge head-on. With a little bit of know-how and a whole lot of determination, you’ll have those doors and windows sealed up tighter than a pickle jar!
Thanks for joining me on this aluminum adventure, folks. Remember, when it comes to sealing strips, don’t cut corners, seal corners! Stay tuned for more aluminum antics, and until next time, keep shining bright like an aluminum diamond!